
How to Assemble the Wind Powered Beast ? Strandbeest instructions
The Wind Powered Mini Strandbeest Kit help to know about the charm of great charm of new and clean energy and to build up children's sense of low-carbon and environment protection. Cultivate children's interest in science and technology through learning the drive principle of machines and the process of the creation and conversion of wind power.
While children are assembling parts they experience joy and fulfillment by overcoming series of challenges, which helps to foster creative thinking of children and develop their minds.
Tool You May Need:
Diagonal Cutter or Scissors
CAUTION:
Please be sure to read the following instructions before assembling this kit.
●Take necessary caution when handling parts with pointed edges. There is a risk of injury.
●Be careful when using the smaller parts so that you do not put them in your mouth and accidentally swallow them. There is a risk of suffocation.
●Keep this kit out of the reach of small children when not in use.
* Please read the instructions and cautions thoroughly before use.
*For your safety, be sure to follow the instructions in this manual. In addition, do not use any parts that have become damaged or deformed during use.
Parts List

Plastic parts

Make sure to cute the plastic parts correctly

Assembling the Body
1, Assembling the legs of the Wind power beast
(1)Attach the rubber feet to the ends of the lower triangles(A)
Line a rubber foot up with the slit on the end of one of the lower triangles (A), and then use the shaft (short) to push the rubber foot into the hole to attach it. Adjust the position of the rubber foot so that it lines up with the middle of the slit. Do the same for all twelve lower triangles (A) to attacha rubber foot to each.

Attach the larger joint on(C)to the largest joint on (B), and then rotate (C) 90°downward.
Line the notches on (C) up with the protrusions on (в) to attach (C) to (B).

(3).Attach a connecting rod (small) (D) to an upper triangle (B).
Arrange the joint on (D) and the joint on (B) so that the protrusions and notches line up as shown in the diagram to attach (D) to (B), and then rotate (D)90°downward.

(4)Attach a lower triangle(A) to two connecting rods.
First, attach the joint on (A) with the protrusion to the joint on (D),and then rotate (A) upward to attach the other joint on (A) to the joint on (C) with the protrusion. This completes one leg.

(5) Complete all twelve legs.
Complete Steps 2 to4 a total of twelve times to assemble the twelve sets of legs.
Make a total of twelve sets like this.
This is the same set as seen from the back.

2, Attaching the crank to the legs
Insert the crankshaft into the slot in the middle of the frame. There are three protrusions on the frame and a protrusion on the joints at each end of the crankshaft. Make sure that the protrusion on the crankshaft is facing in the same direction as those on the frame. Make two sets like this.

(2) Connect the right leg and crank together with a single- action rod (small)(E).
Attach the largest joint on the leg to the joint on the right side of the frame so that the rubber foot on the leg is at the bottom. Attach (E) to the upper joint on the leg so that the protrusion and notch line up, and then push the key part on (E) down onto the crank as shown by the arrow so that it snaps into place.
the leg should be attached to the joint on the right side of the frame as seen from the side with the crankshaft.

(3) Connect the left leg and crank together with a single-action rod (large)(F).
Attach the largest joint on the leg to the joint on the left side of the frame so that it is opposite
from the right side, and then attach (F) to the lower joint on the leg and push it down onto the
crank that was attached in Step 2 so that it snaps into place. When completing this step, make sure to protrusion the newly attached rod So that it is in front

(4) Connect the right leg and crank together with a single-action rod (large)(F).
Attach (F) to the lower joint on the right leg, and then push it onto the crank that was attached in Steps 2 and 3 until it snaps into place. Make sure to position the newly attached rod so that it is in front.

(5)Connect the left leg and crank together with a single action rod (small)(E).
Attach (E) to the upper joint on the left leg, and then push it onto the crank that was attached in Steps 2, 3, and 4 until it snaps into place. Make sure to position the newly attached rod so that it is in front.
Once you have attached both legs, check to make sure that the rods attached to the crank are in the order of upper left, lower right, lower left, and upper right, as seen from the front. If the order is different ,the legs may not move smoothly.

(6) Attach the second frame(G).
Attach the second frame firmly to the first frame (G), so as to sandwich the legs that you put together in Steps 2 to 5. Line up the three joints on the frames, and position the slot in the middle of the frame so that it snaps into place on the central axis of the crankshaft.

(7) Attach legs to make three sets.
Repeat Steps 2 to 6 until you have assembled three pairs of legs for a total of six legs on four frames, connected to the crankshaft. This completes one half of thr body of the Wind power beast.
Check to make sure that the legs move smoothly by turning the crankshaft. If the legs do not move correctly, go back to Step 5 and check to make sure that the rods are in the correct order.
If the frames do not seem to be attached together properly, make sure that each frame is firmly attached to the crankshaft.
Use the remaining parts to make one more assembly just like this.

3, Putting the body together
Fold the rubber band into two loops, and position it so that the tops of the frames pass through it. Attach the two body assemblies together.
Attach the two body assemblies together, oriented so that the joints on the frames and crankshaft face in the same direction. When attaching, fold the rubber band over into a double loop, and position the loops in between the joints on the tops of the frames on the assemblies.
Attach the right and left sides of the body together, making sure that the legs are not positioned in the same way. If the legs are all positioned the same way, turn the joint on the crankshaft 180°on one side only.

(2) Insert he shafts (long) into the frames.
Insert the shafts (long) into the holes on the frames shown in the diagram. Adjust the shafts (long) so that they stick out on either end by a small amount. After completing these adjustments, pull on each rubber band loop and hook them around the ends of the frames.

(3)Attach the stoppers (H2).
Attach stoppers (H2) to the protrusions on the frames on either end of the body(three on each side for a total of six).

4, Assembly the wind turbine
(1)Attach the blades.
The first fan at the two pillars of T type side mount, as shown below, Then the 2 parts (I) with two pillars. The remaining 4 blades are all in the same way to the base. Do the same for all four blades to attach them.

(2) Insert the cogwheel shaft into the body.
Insert the cogwheel shaft into two frames on the body. Once you have inserted it into the second frame, turn the cogwheel shaft 90° so that it snaps into place.
Turn the cogwheel shaft while pushing on it to firmly attach it.

(3) Attach the cogwheels
After attaching the cogwheel (small) to the crankshaft axis, attach the cogwheel (large) to the cogwheel shaft and push it in until it snaps into place.

(4) Attach the wind turbine
After attaching the cogwheel (small) to the crankshaft axis.
Make sure to leave about 1 to 2 mm of space open between the shaft and the wind turbine to ensure that the wind turbine rotates smoothly.

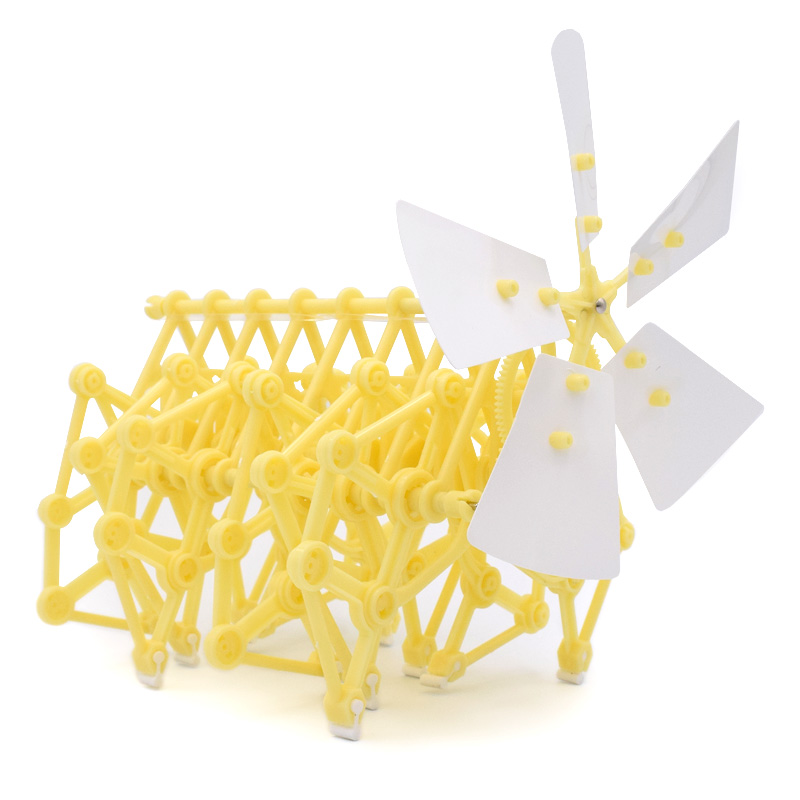
(5) Finished !
5, Getting the wind power beast to walk
a)Using wind to make it move.
You can wave a round paper fan or a folding fan toward it or use an electric fan to blow air at it. Once wind hits the Wind power beast will start walking toward the left as seen from the side of the wind turbine.

b)Using the rotating shaft to make it move by hand.
The shaft and the flange joint (H1) are connected together by a pipe. When you turn the rotating Shaft. the wind power beast will walk to the same direction in which the shaft is being turned. Be careful not to turn it so hard that the tube gets too twisted.

- Company Info
- About Us
- Contact Us
- Customer Reviews
- Company Blog
- Company Policies
- Payment & Shipping
- Sitemap
- How to Order?
- FAQs
- User Center
- Easy Login or Register
- My Account
- My Orders
- Forget Password
- Tracking Orders
- Leave a Message Online
- Submit a Product
- Newsletter
-
Subscribe for Updates. We'll let you know about the latest deals & newest products.
- Join our community
Copyright © 2024 VEASOON . All Rights Reserved.
![]()
![]()
![]()
![]()
![]()
![]()
![]()
![]()
![]()
![]()
![]()
![]()
![]()
![]()
![]()
![]()
![]()
![]()
![]()